In today’s sedentary work culture, an ergonomically designed office chair is essential for boosting productivity and safeguarding your well-being. The Branch Ergonomic Chair stands out as a customizable tool, meticulously crafted to conform to your unique body shape and specific ergonomic needs. This comprehensive guide will walk you through the various adjustments available on the Branch Ergonomic Chair, empowering you to create a personalized seating experience that promotes comfort and enhances your workspace productivity.
Adjusting Your Branch Ergonomic Chair
Understanding the Features of Your Branch Ergonomic Chair
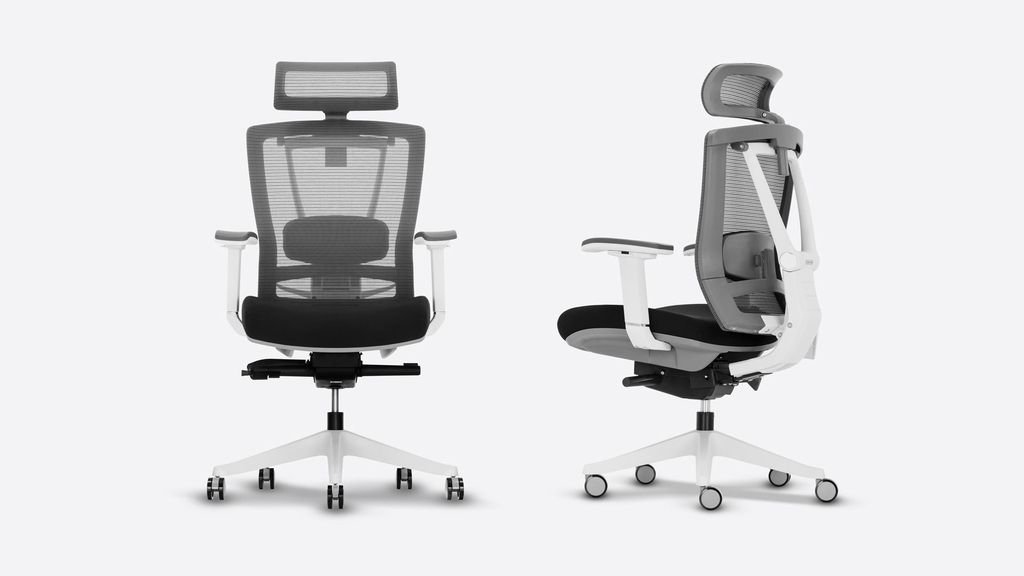
The Branch Ergonomic Chair boasts an impressive array of adjustable features, each designed to cater to individual comfort preferences and ergonomic requirements. With seven distinct points of adjustment, this modern office chair allows you to fine-tune your seating position for optimal support and comfort. Let’s take a closer look at these key features:
Seat Height Adjustment: The height-adjustable seat ranges from 17 inches to 21 inches, accommodating a wide variety of users and desk heights. This feature ensures that your feet rest comfortably on the floor, reducing strain on your legs and promoting proper circulation.
Seat Depth Adjustment: The seat’s depth can be adjusted from 18 inches to 21 inches, allowing you to find the perfect fit for your body size. This adjustment helps maintain the ideal distance between the back of your knees and the front edge of the seat, preventing discomfort and promoting healthy posture.
Backrest Tilt and Tension: The Branch Ergonomic Chair offers adjustable backrest tilt and tension settings, enabling you to find the perfect balance between support and recline. This feature is particularly beneficial for those who spend long hours at their desk, as it allows for periodic changes in posture to reduce muscle fatigue.
Lumbar Support: The adjustable lumbar support is a crucial feature for maintaining proper spinal alignment and reducing lower back strain. By customizing the height and depth of the lumbar support, you can ensure that your lower back receives the necessary support, even during extended sitting sessions.
Armrest Adjustments: The chair features fully adjustable armrests, allowing you to customize their height, width, and depth. This flexibility ensures that your arms remain comfortably supported while typing or performing other desk tasks, minimizing strain on your shoulders and upper back.
Optional Headrest: For those seeking additional support, the Branch Ergonomic Chair offers an optional headrest that can be adjusted for both height and angle. This feature is particularly beneficial for taller individuals or those who frequently recline in their chair, providing essential support for the head and neck.
Step-by-Step Guide to Adjusting Your Branch Ergonomic Chair
Now that you’re familiar with the key features of the Branch Ergonomic Chair, let’s dive into the process of adjusting each component for optimal comfort and support.
Adjusting the Seat Height
Adjusting the Seat Height
Sit on the chair with your feet flat on the floor and your back pressed against the backrest.
Locate the seat height adjustment lever, typically located beneath the right side of the seat.
While seated, pull the lever upwards and adjust the seat height until your feet rest comfortably on the floor, with your thighs parallel to the ground.
Release the lever to lock the seat height in place.
Adjusting the Seat Depth
Seat Depth
Sit on the chair with your back firmly against the backrest and your feet flat on the floor.
Locate the seat depth adjustment lever, usually found beneath the left side of the seat.
Pull the lever outwards and slide the seat forward or backward until there is approximately a two-finger width gap between the back of your knees and the front edge of the seat.
Release the lever to lock the seat depth in place.
Adjusting the Backrest Tilt and Tension
Sit on the chair with your back pressed against the backrest and your feet flat on the floor.
Locate the backrest tilt adjustment lever, typically located on the right side of the seat, near the base.
Pull the lever outwards to unlock the backrest tilt, and lean back to find your desired recline angle.
Push the lever inwards to lock the backrest tilt in place.
To adjust the tension, locate the tension adjustment knob, usually found beneath the front edge of the seat.
Turn the knob clockwise to increase tension (more resistance when reclining) or counterclockwise to decrease tension (less resistance when reclining).
Adjusting the Lumbar Support
Sit on the chair with your back pressed against the backrest and your feet flat on the floor.
Locate the lumbar support adjustment handles, typically found on the backrest, near the lower back area.
Use the handles to adjust the height and depth of the lumbar support until you feel comfortable pressure in your lower back region.
Release the handles to lock the lumbar support in place.
Adjusting the Armrests
Sit on the chair with your arms resting comfortably at your sides, elbows bent at a 90-degree angle.
Locate the armrest height adjustment buttons, usually found on the outer side of each armrest.
Press and hold the buttons while raising or lowering the armrests until your elbows are slightly above the armrest surface when typing or performing desk tasks.
Release the buttons to lock the armrest height in place.
To adjust the armrest width, locate the width adjustment levers, typically found beneath each armrest.
Pull the levers outwards and slide the armrests inwards or outwards to your desired width.
Push the levers inwards to lock the armrest width in place.
For armrest depth adjustment, grasp the front portion of the armrest and slide it forward or backward to find your preferred position.
Adjusting the Optional Headrest
If your Branch Ergonomic Chair includes the optional headrest, sit on the chair with your back pressed against the backrest and your head in a neutral position.
Locate the headrest height adjustment lever, typically found on the back of the headrest.
Pull the lever upwards and adjust the headrest height until it comfortably supports the back of your head and neck.
Release the lever to lock the headrest height in place.
To adjust the headrest angle, grasp the headrest and gently tilt it forward or backward until you find a comfortable position that supports your head and neck while maintaining a neutral spine.
Branch Ergonomic Chair Assembly
Ergonomic Tips for Optimal Comfort and Productivity
In addition to adjusting your Branch Ergonomic Chair, there are several ergonomic best practices that can further enhance your comfort and productivity:
Monitor Positioning: Position your computer monitor at eye level, approximately an arm’s length away from your body. This helps reduce neck strain and eye fatigue.
Keyboard and Mouse Placement: Keep your keyboard and mouse close to your body, with your elbows bent at a 90-degree angle. This minimizes reaching and reduces strain on your shoulders and wrists.
Footrest Usage: If your feet don’t rest comfortably on the floor after adjusting your seat height, consider using a footrest to maintain proper leg positioning and circulation.
Frequent Breaks: Take short breaks every 30 minutes to an hour, standing up and stretching to promote circulation and reduce muscle fatigue.
Posture Mindfulness: Regularly check your posture throughout the day, ensuring that your ears, shoulders, and hips are aligned in a straight line.
Conclusion
Investing in a high-quality ergonomic chair like the Branch Ergonomic Chair is a significant step towards creating a comfortable and productive workspace. By taking the time to understand and adjust the various features of your chair, you can create a personalized seating experience that promotes proper posture, reduces strain, and enhances your overall well-being.Remember, achieving optimal comfort is an ongoing process. As you spend more time in your Branch Ergonomic Chair, continue to fine-tune the adjustments based on your body’s feedback and changing needs. With a commitment to ergonomic best practices and a carefully adjusted chair, you’ll be well on your way to mastering comfort and unlocking your full productivity potential.
What is the Branch Ergonomic Chair?
The Branch Ergonomic Chair is a high-quality office chair designed with comfort and adjustability in mind. It’s not specifically mentioned in the search results, but it’s likely to have features such as adjustable height, seat depth, armrests, and lumbar support.
How can I adjust the height of my Branch Ergonomic Chair?
While specific instructions aren’t provided in the search results, most ergonomic chairs have a lever under the seat that you can use to adjust the height. Pull the lever up while seated to lower the chair, or stand up and pull the lever to raise it.
How can I adjust the seat depth of my Branch Ergonomic Chair?
Again, specific instructions aren’t provided in the search results, but many ergonomic chairs allow you to adjust seat depth. Look for a lever or knob under the seat that you can slide or turn to move the seat forward or backward.
How can I adjust the armrests on my Branch Ergonomic Chair?
While the search results don’t provide specific instructions, most ergonomic chairs have adjustable armrests. Look for buttons or levers on the armrests that you can use to raise, lower, or move them in or out.
How can I adjust the lumbar support on my Branch Ergonomic Chair?
The search results don’t provide specific instructions for this chair, but many ergonomic chairs have adjustable lumbar support. Look for a knob or lever on the back of the chair that you can turn or slide to adjust the lumbar support.